


Daisy nails 2026 are one of the most versatile and widely worn nail designs of the year — you can paint a single minimalist daisy on one accent nail in under three minutes, or build a full multi-dimensional daisy garden using 3D gel sculpting, pressed real flowers, or stamping plates across an entire set. The most popular daisy nail styles right now are: dotting-tool daisies on solid color bases, micro daisy French tips, daisy chain nail wraps, and raised 3D daisy clusters on clear or nude gel extensions. Whether you want something quick and DIY or genuinely show-stopping, this guide has 20+ original daisy nail design ideas — all different from anything else in this series — with steps for every single look.
Why Daisy Nails 2026 Are Trending So Hard
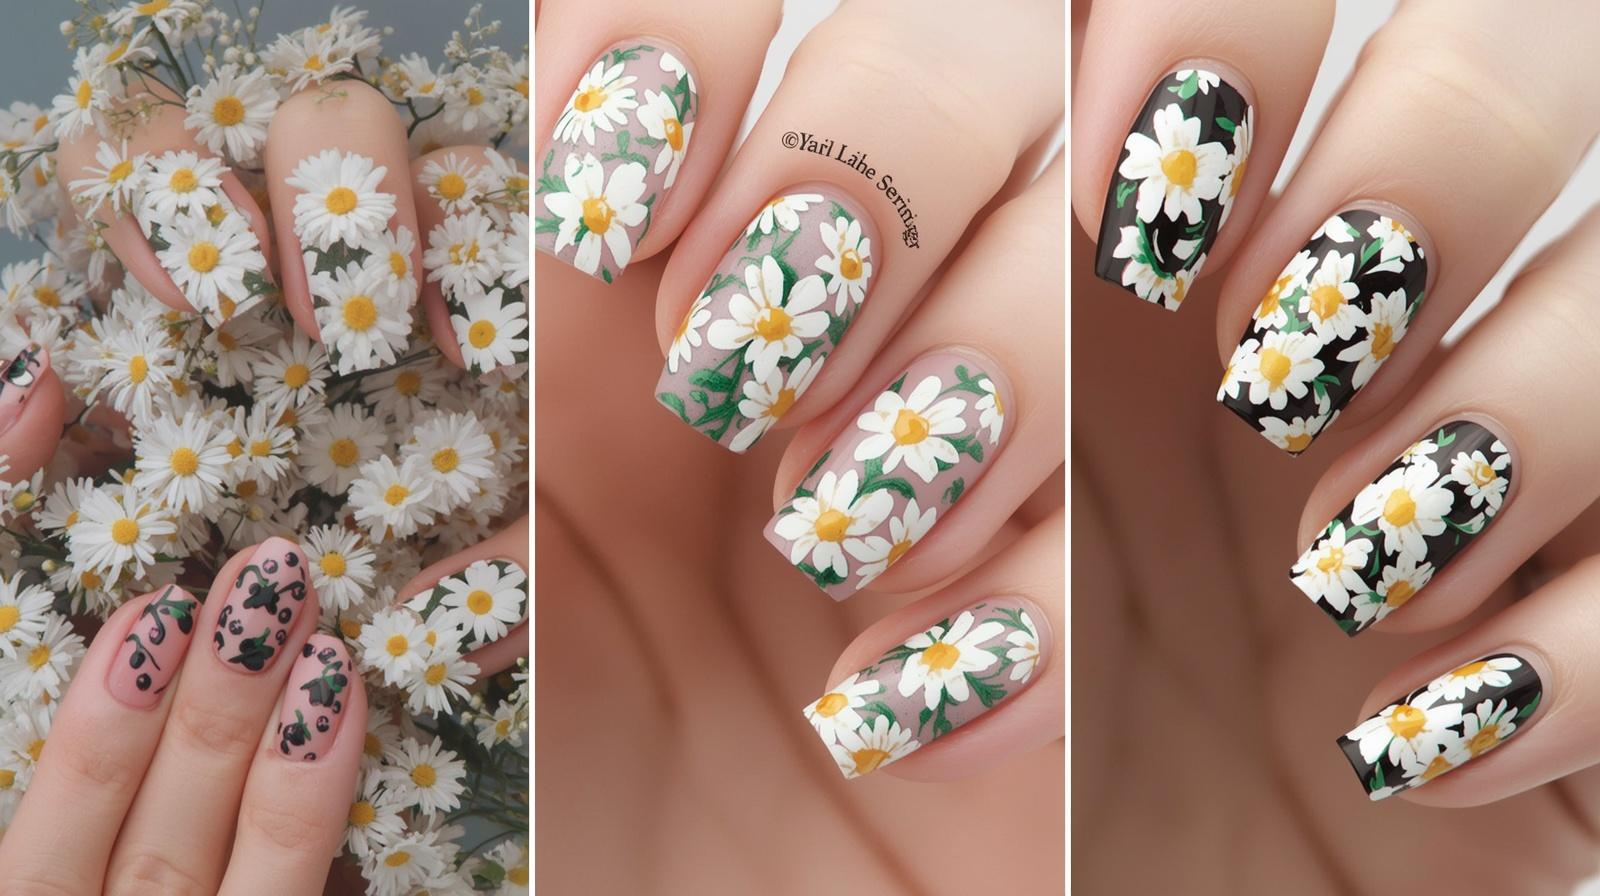
The daisy has become the defining flower of 2026 nail culture — and there’s a specific reason it’s beaten out roses, peonies, and tulips for the top spot. Daisies are deceptively simple. Five petals and a center dot. That’s it. But that simplicity is exactly what makes them so endlessly adaptable — they scale from a beginner’s dotting tool attempt to a master nail artist’s 3D sculptural work, and both results are beautiful. They work on every nail length, every shape, every skin tone, and every season from early spring through late summer. They pair with pastels, neons, neutrals, and darks. They suit a child’s birthday party and a fashion week street style moment with equal ease. Daisy nail design ideas in 2026 have evolved far beyond the classic white-petal-yellow-center that everyone knows — and this guide covers the full evolution.
20+ Daisy Nail Design Ideas for 2026
1. Classic White Daisy on Cobalt Blue
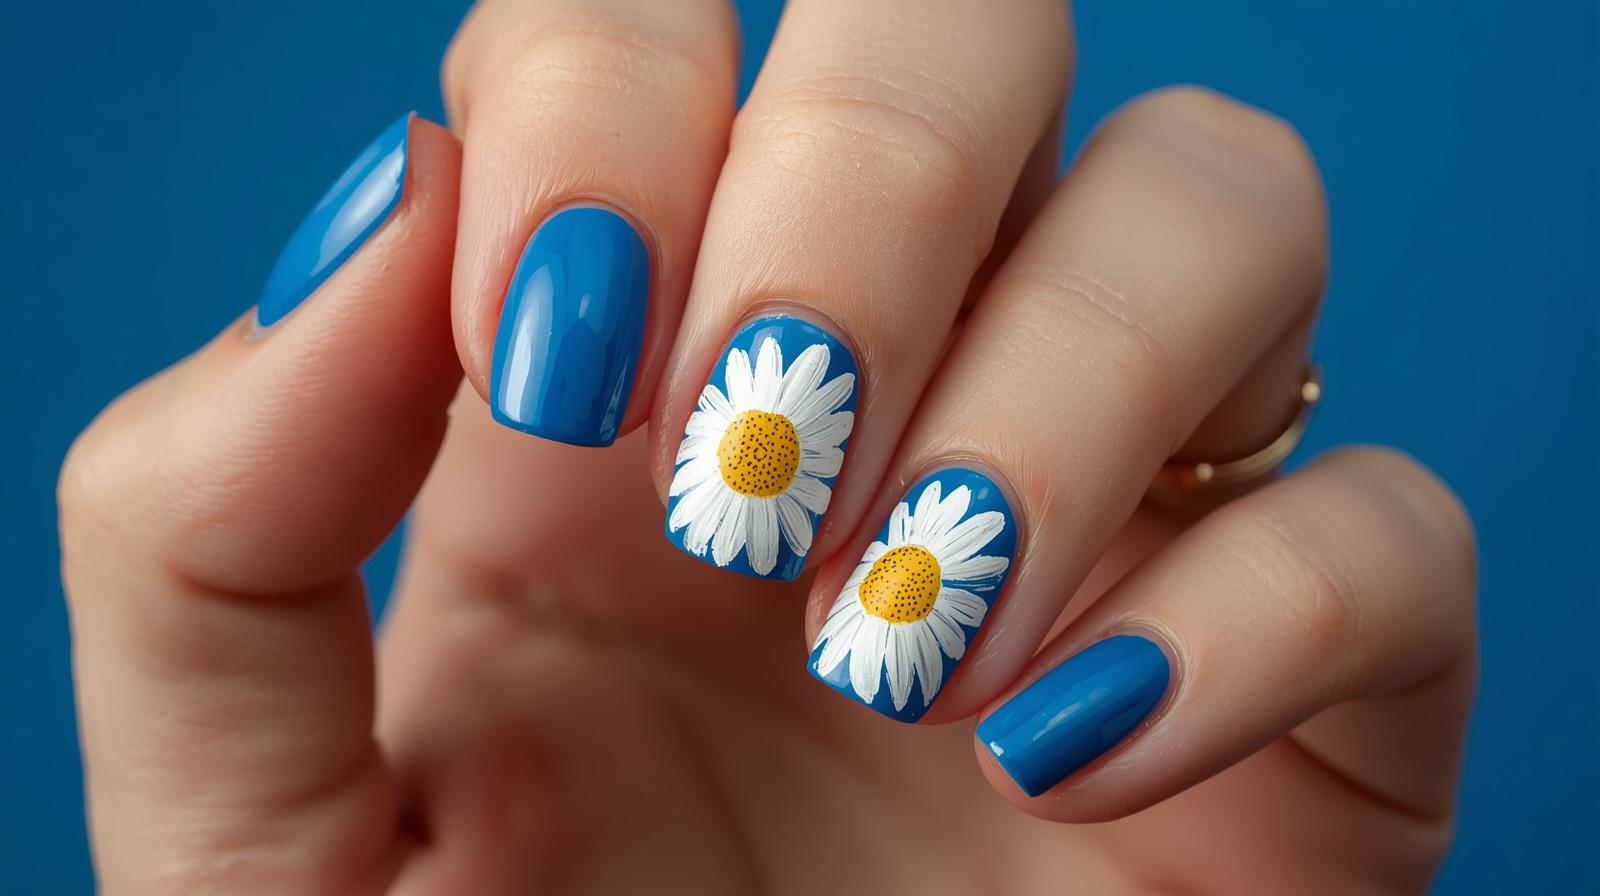
A high-contrast combination that looks bold and graphic — five white petals and a yellow center on a saturated cobalt blue base. The blue makes the white pop with an intensity that softer bases can’t replicate, and the result reads as both summery and fashion-forward. Particularly stunning on short square and short oval nails where the blue base is fully visible around the daisy design.
How to Create This Look:
- Step 1: Apply two coats of cobalt blue polish and let dry completely — this base needs to be fully opaque before any art begins.
- Step 2: Use a medium dotting tool dipped in white to place five evenly spaced dots in a circular arrangement on one or more accent nails, then add a slightly larger yellow center dot immediately in the middle.
- Step 3: Once fully dry, add tiny white petal tips by dragging a liner brush outward from each white dot, then seal with glossy top coat.
2. Daisy Chain Nail Art — Connecting Flowers
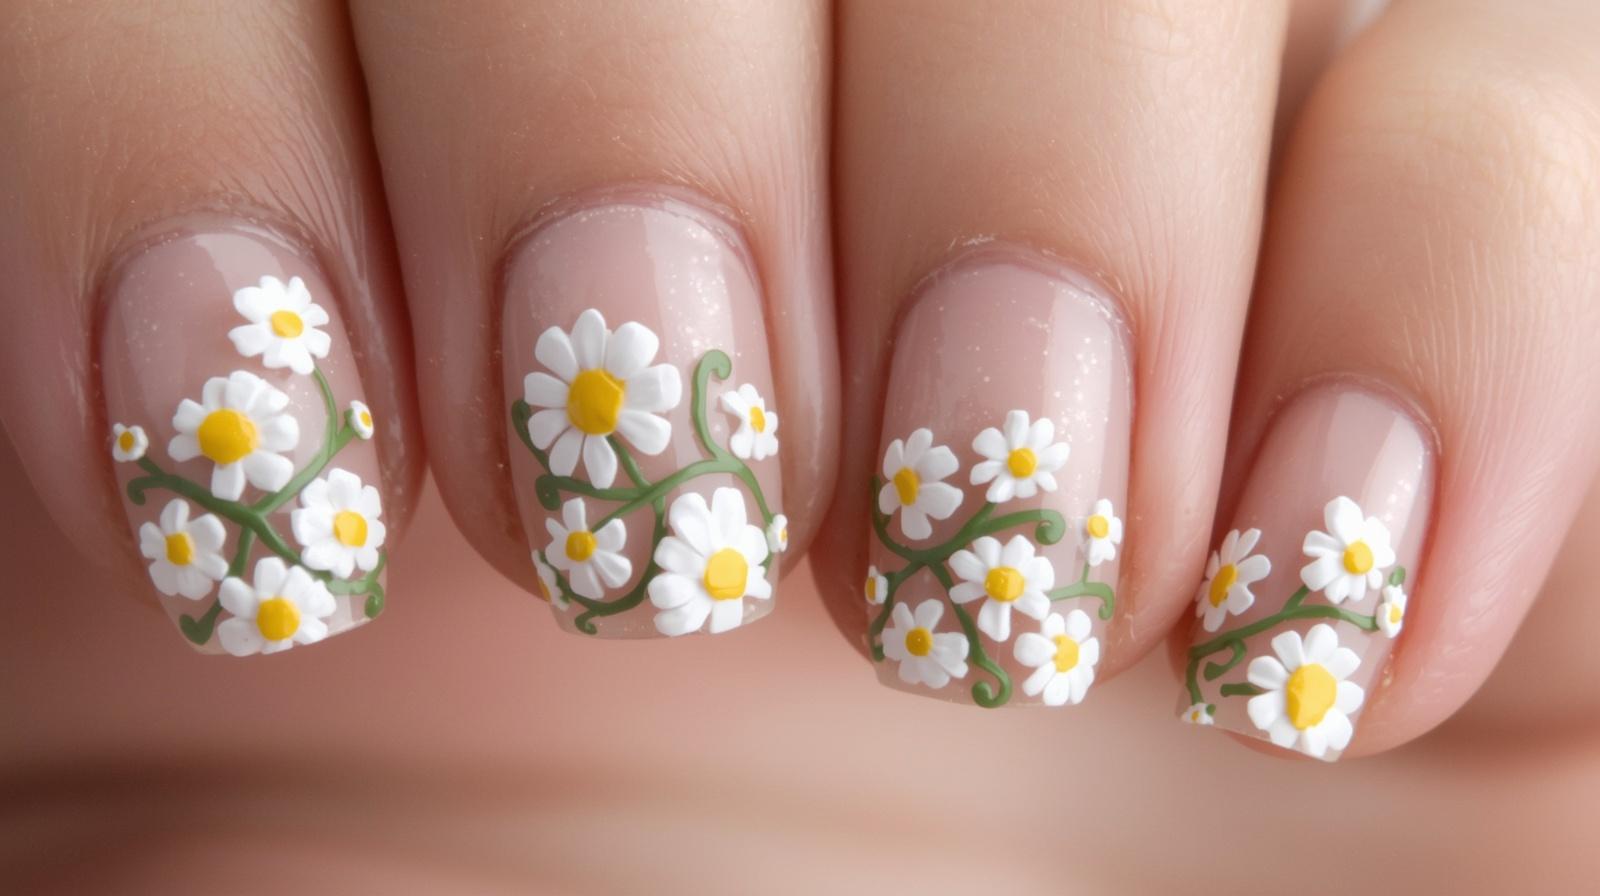
Instead of isolated flowers, daisy chain nails connect each bloom with thin green stems that loop across the nail from one side to the other — just like the real flower chains children weave in parks. The linked daisies create movement and flow across the nail surface that single flowers can’t achieve. Especially beautiful on medium to long almond nails where the chain has room to curve naturally across the nail bed.
How to Create This Look:
- Step 1: Apply a sheer nude or warm white base and dry fully.
- Step 2: Using a fine liner brush, draw a thin, winding green stem across the nail from the bottom left to the top right — add small loops along the stem where each daisy will be placed.
- Step 3: Use a small dotting tool to build daisies at each loop point — five white petals, yellow center — then seal with a glossy top coat once all art is completely dry.
3. Micro Daisy French Tip
The French tip smile line is replaced by a row of tiny micro daisies — each one barely two millimeters wide — painted in tight formation across the nail tip on a nude or sheer base. Up close it looks impossibly intricate; from a distance it reads as a delicate decorative tip. A completely unique take on french tip nail design ideas that works especially well on short and medium oval nails.
How to Create This Look:
- Step 1: Apply a nude or milky base across all nails and dry fully.
- Step 2: Using the very tip of a fine liner brush, paint tiny five-dot daisies along the nail’s tip edge — work in clusters of three to five flowers per nail, keeping each bloom under three millimeters wide.
- Step 3: Add the tiniest yellow center dots using a fine pin tool or toothpick tip, let dry fully, then seal with a glossy top coat.
4. Daisy and Butterfly Duo Nails
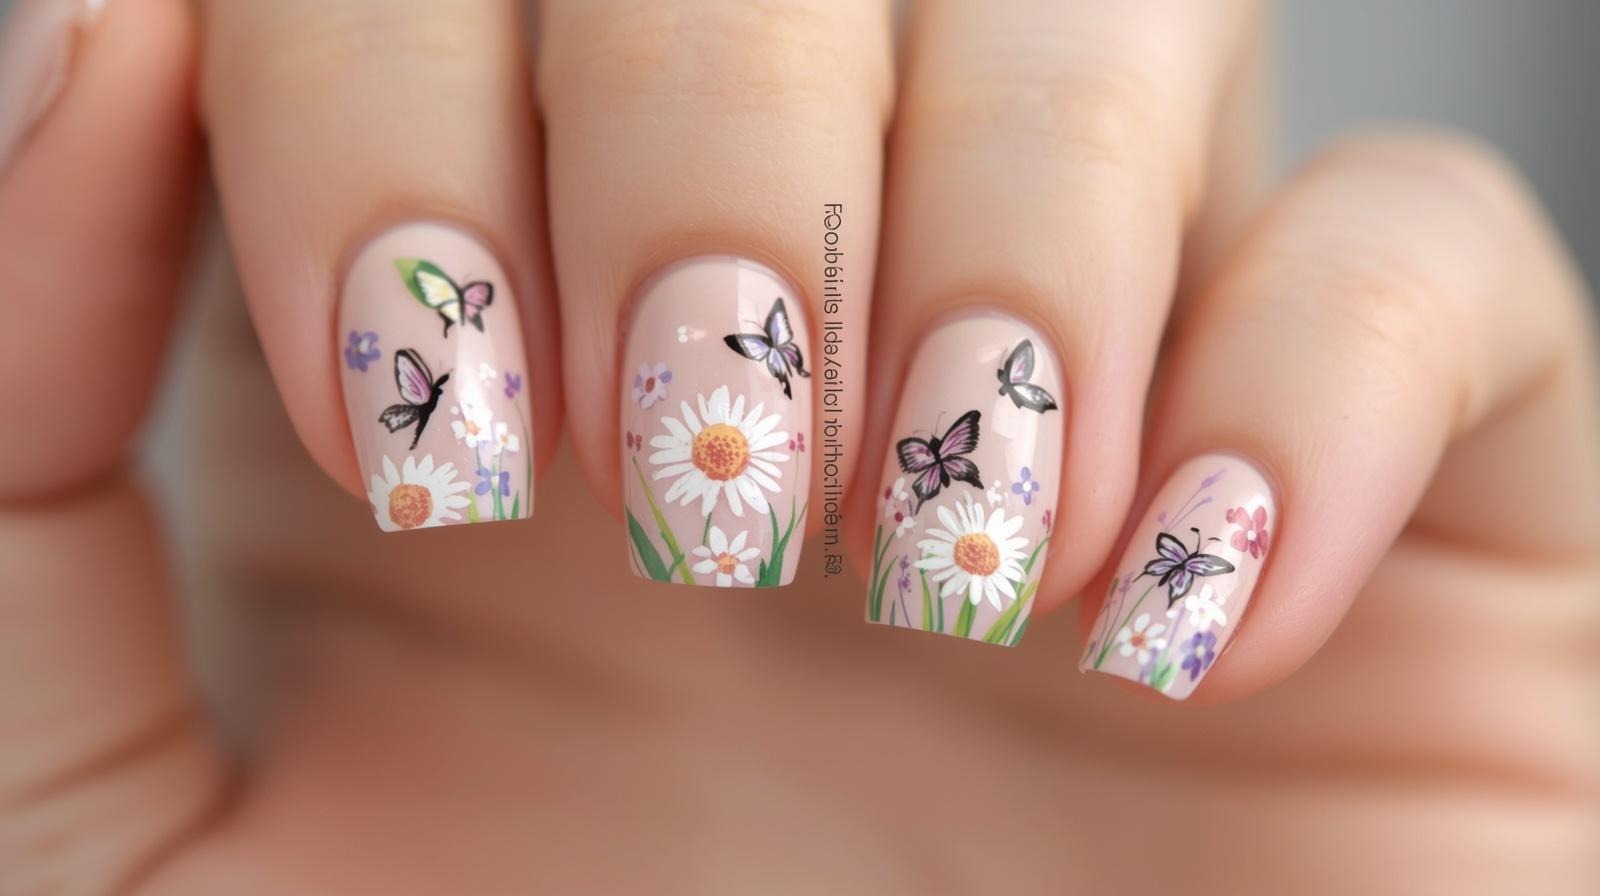
A hand-painted daisy on one accent nail paired with a delicate butterfly silhouette on the adjacent nail creates a complete garden scene without any single nail feeling overcrowded. The butterfly can be as simple as two open wing shapes in black outline, or as elaborate as a monarch butterfly in full amber and black detail. This combination is one of the most saved spring nail design ideas across Pinterest and TikTok nail communities in 2026.
How to Create This Look:
- Step 1: Apply a soft sage or dusty lavender base across all nails and dry fully.
- Step 2: On your ring finger, paint a single centered daisy using white and yellow — on your middle finger, use a fine liner to sketch two open butterfly wings meeting at a central body point.
- Step 3: Add color detail to the butterfly wings if desired, let all art dry completely, then seal both accent nails and remaining solid nails with a glossy top coat.
5. Negative Space Daisy Nails
The daisy outline is painted in a single color — deep navy, black, or gold — with the interior of each petal left completely bare as negative space, so the real nail acts as the petal fill. The center is a solid filled dot in a contrasting color. The result is graphic, modern, and completely unlike the conventional filled daisy design. Best on short to medium square and oval nails.
How to Create This Look:
- Step 1: Apply a very sheer or clear base coat and dry — the bare nail is a key part of this design.
- Step 2: Using a fine liner brush loaded with your outline color, draw individual petal outlines — open ovals around a central point — without filling any of them in.
- Step 3: Fill the center with a solid contrasting dot, dry fully, then seal with matte or glossy top coat.
6. 3D Raised Daisy Cluster Nails
Using gel builder or acrylic, actual raised daisy petals are sculpted off the nail surface so each flower has real physical dimension — the petals curl slightly upward at their tips, the center sits elevated, and the whole cluster casts a tiny shadow on the nail below it. This is the premium version of daisy nail art and the most frequently photographed daisy design in nail salons right now. Best shown off on coffin or almond extensions where the full depth of the sculpture is visible.
How to Create This Look:
- Step 1: Complete your base manicure and cure fully. Using a fine nail art brush, scoop a small bead of white hard gel or acrylic onto the nail surface and shape each petal individually — narrow at the base, widening toward a rounded tip, then curving upward slightly at the edges before curing.
- Step 2: Build five petals per flower in a radiating arrangement, curing between each grouping, then add a small bead of yellow or golden gel for the center — pressing it slightly to flatten and cure.
- Step 3: Apply a glossy gel top coat around the 3D flowers only — avoid coating the textured center directly to preserve the natural matte finish of the gel sculpture.
7. Daisy on Dark: Black Base Statement Nails
White daisies on a black base is the highest-contrast daisy combination possible — and the result is dramatically beautiful in a way that’s unexpected for a traditionally sweet flower. The black background transforms the daisy from feminine and soft into graphic and editorial. This is the daisy nail design idea for people who thought daisy nails weren’t for them — it’s bold, confident, and absolutely not soft-girl aesthetic.
How to Create This Look:
- Step 1: Apply two full coats of deep matte or glossy black polish and dry completely.
- Step 2: Use a medium dotting tool with white to place five petal dots in a circle on accent nails — work deliberately and place each dot at equal distance from the center point.
- Step 3: Add a yellow or white center dot, let dry fully, then choose between sealing with glossy top coat for maximum contrast or matte top coat for an editorial, fashion-forward finish.
8. Watercolor Daisy Wash Nails
Rather than painting crisp, defined daisies, this technique creates soft, bleeding watercolor versions — the petals are blurred at their edges, the colors bleed into each other, and the overall effect looks like a botanical watercolor study rather than a nail design. In soft violet-white on a cream base, the result is deeply artistic. This is a unique technique not covered anywhere else in this nail content series. Check our floral nail designs 2026 guide for the full watercolor technique explained in detail.
How to Create This Look:
- Step 1: Apply a cream or warm white base and while still slightly tacky, use a flat brush loaded with very diluted lavender or blush polish to sweep loose petal shapes — they should bleed softly into the base rather than sitting on top with hard edges.
- Step 2: Add a small concentrated yellow center dot immediately while the petals are still wet — it will naturally blur into the surrounding color for a soft, layered effect.
- Step 3: Let dry completely without disturbing the wet blends, then seal gently with one coat of glossy top coat.
9. Daisy Stamped Accent Nail
A full daisy field pattern — dozens of tiny flowers in neat repeating rows — transferred onto one or two accent nails using a nail stamping plate creates an instant, professional-looking daisy design that takes under ninety seconds per nail. Pair the stamped nails with solid color nails in the same palette for a cohesive, editorial set that looks deliberately designed rather than busy.
How to Create This Look:
- Step 1: Apply a contrasting base on your accent nails — coral for white stamping, black for gold stamping, or nude for white — and dry completely.
- Step 2: Apply stamping polish to a daisy-pattern plate, scrape cleanly, pick up the image with your stamper and press firmly onto the accent nail in one clean motion. Lift immediately straight up without sliding.
- Step 3: Let the stamp dry for sixty seconds before sealing with top coat — apply it in one smooth swipe to avoid smearing the fine daisy details.
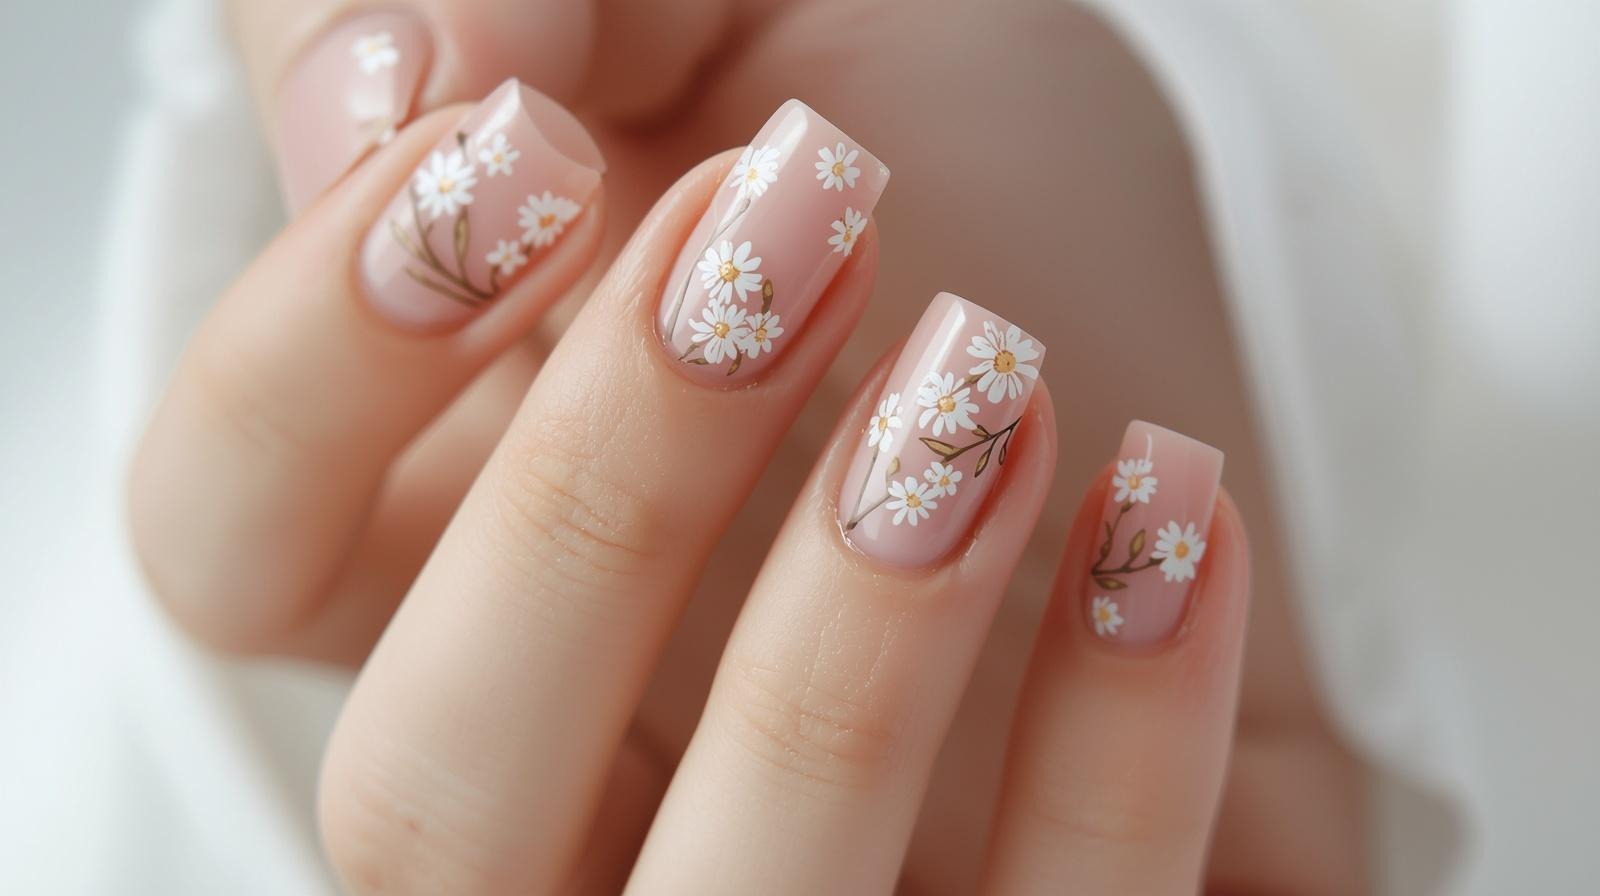
10. Daisy Nails with Colored Petals
Who says daisies have to be white? In 2026, colored-petal daisies are everywhere — lavender petals with gold centers, burnt orange petals with dark brown centers, pastel pink petals with cream centers. Each color variation creates a completely different mood while keeping the familiar daisy structure. Lavender daisies on nude nails are romantic. Orange daisies on terracotta are earthy. Pink daisies on white are joyful. For more color-to-skin-tone matching guidance, our spring nail ideas by skin tone guide breaks this down in detail.
How to Create This Look:
- Step 1: Apply your chosen base color and dry completely — pick a base that complements rather than matches your petal color for the best contrast.
- Step 2: Use a dotting tool in your chosen petal color to build five-dot daisy shapes on accent nails — space the dots slightly further apart than you normally would so the colored petals have room to breathe visually.
- Step 3: Add a center dot in a contrasting color — dark brown for orange petals, gold for lavender, white for pink — let dry, then seal with a glossy top coat.
11. Real Pressed Daisy Encapsulated Nails
A real dried and pressed daisy head — available from craft stores and nail supply shops — encapsulated inside a clear or sheer gel extension creates a nail that genuinely looks like spring preserved forever under glass. The real flower’s natural color variation, texture, and organic shape make every nail completely unique. This is the most botanically authentic daisy nail design possible, and no two sets will ever look identical.
How to Create This Look:
- Step 1: Apply a clear or sheer gel base and cure until just tacky — don’t overcure or the daisy won’t adhere properly to the surface.
- Step 2: Position a fully pressed and dried daisy head onto the tacky gel using fine tweezers, then carefully seal with a generous layer of clear builder gel, ensuring all edges of the flower are fully covered. Cure completely.
- Step 3: File and buff the surface smooth if the gel has any unevenness over the flower, then apply a final high-gloss gel top coat and cure for a glass-smooth, preserved botanical finish.
12. Daisy Gradient Nails — Color-Shifting Petals
Each daisy petal is painted in a gradient that shifts from one color at the base to another at the tip — the same technique used for full-nail ombres applied to individual petals. Blush-to-white petals look ethereal. Yellow-to-orange petals look like sunlit wildflowers. Purple-to-pink looks like garden fantasy. A completely original daisy nail design idea that nobody outside advanced nail art communities has widely adopted yet in 2026.
How to Create This Look:
- Step 1: Apply your base and dry fully. Using a flat nail art brush loaded with your lighter petal color at the tip and your deeper color at the base, paint each petal in a single stroke — the two colors will blend naturally through the bristles as you stroke outward.
- Step 2: Build five gradient petals per flower and a solid contrasting center dot, allowing brief drying time between petals to prevent color bleeding between adjacent petals.
- Step 3: Seal with a glossy top coat once all gradient petals are fully dry.
13. Daisy Nails with Dew Drop Details
Tiny, transparent gel “dew drops” placed on the petals and center of each daisy create the illusion of morning dew resting on fresh flowers — an incredibly realistic and tactile effect that makes the nails look almost edible. The droplets are built using a tiny bead of clear gel that’s domed on top of the dried daisy design and cured without flattening. The result is three-dimensional in a completely different way from 3D sculpted flowers.
How to Create This Look:
- Step 1: Complete your daisy design — any method works — and seal with a gel top coat, curing fully.
- Step 2: Using a fine dotting tool, place tiny individual beads of clear gel directly onto the dried daisy petals and center — one small dome per petal tip and one larger dome on the flower center — without flattening them.
- Step 3: Cure immediately in a UV lamp to set the gel domes in their rounded shape, then apply a thin protective layer of gel top coat around the dew drops without coating over them to keep their domed transparency.
14. Retro Groovy Daisy Nails
Inspired by 1970s retro graphics, groovy daisy nails feature large, bold daisies with thick petals and oversized centers in warm retro tones — harvest orange, avocado green, chocolate brown, and cream — on a solid base in the same palette. The petals are slightly irregular and chunky rather than delicate, giving them a graphic, printed feel rather than a painterly one. This specific retro-daisy style is genuinely new territory for this content series and taps directly into the 70s-revival aesthetic dominating 2026 fashion.
How to Create This Look:
- Step 1: Apply a warm cream or harvest orange base and dry fully.
- Step 2: Using a medium round brush, paint broad, slightly uneven petals in avocado green or chocolate brown — make them deliberately chunky and not perfectly symmetrical, since the retro aesthetic celebrates imperfection.
- Step 3: Fill the center with a large, flat circle in contrasting warm orange or cream, let dry fully, then seal with a glossy top coat that enhances the retro, slightly lacquered quality of the design.
15. Daisy Nails for Short Nails — Minimalist Single Bloom
On short nails, one perfectly placed daisy on a single accent nail — everything else solid — is often more impactful than daisies on every finger. The restraint makes the single flower feel intentional, curated, and high-fashion rather than cute. This is the nail design idea for the person who always gets asked “where did you get your nails done?” despite doing them at home in fifteen minutes. See our simple spring nails guide for more minimalist approaches to short nail designs.
How to Create This Look:
- Step 1: Apply your chosen base color to all nails — a single, clean shade works best for this minimalist approach.
- Step 2: On one accent nail only, use a dotting tool to paint one daisy centered precisely in the middle of the nail — five white petals in a clean circular arrangement with a yellow center.
- Step 3: Seal all nails with a matching finish top coat — glossy for a polished look, matte for a more editorial, quiet-luxury result.
How to Choose Your Daisy Nail Design
Choosing the right daisy nail design for 2026 comes down to four simple questions. First — how much time do you have? The minimalist single bloom, dotting-tool classic, and stamp designs take under fifteen minutes. The 3D sculpted cluster, encapsulated pressed daisy, and dew drop designs need significantly more time and either gel equipment or a salon visit. Second — what’s your nail length? Short nails look best with micro daisy tips, single accent blooms, and negative space outlines. Longer almond and coffin shapes handle the daisy chain, 3D clusters, and chain scene designs beautifully. Third — what’s your aesthetic? Soft and feminine: watercolor wash, lavender petals, daisy chain. Bold and graphic: black base daisies, cobalt blue contrast, retro groovy. Artistic and premium: 3D sculpted, pressed real daisy, dew drop gel. Fourth — what’s your skill level? If you’ve never done nail art before, the dotting tool daisy on any base is genuinely foolproof — five dots and a center, and you’re done. Build from there.
Best Products to Achieve This Look
🛒 VAGA Nail Art Dotting Tool Set — 5 Double-Ended Pens
Why we love it: Every dotting-tool daisy design in this guide — from the classic five-dot to the micro French tip to the colored petal versions — is built with a dotting tool. The VAGA set gives you five different tip sizes in a single kit, so you can create daisies at any scale from micro-miniature to bold statement blooms. The steel tips hold their shape and don’t splay or bend after repeated use.
Best for: Beginners and intermediate nail artists who want to master every variation of the dotting-tool daisy before moving to more advanced freehand or sculptural techniques.
→ Find it on Amazon: VAGA Nail Art Dotting Tool Set

🛒 Modelones Polygel Nail Kit — White and Clear
Why we love it: The 3D sculpted daisy cluster and the gel dew drop designs both need a polygel or hard gel that holds its shape while you sculpt before curing — and Modelones’ polygel in white and clear is the perfect dual-pack for exactly this. The white is the right consistency for petal sculpting — not too runny, not too stiff — and the clear makes flawless dew drop domes that cure to a glass-like transparency.
Best for: Anyone attempting the 3D sculpted daisy, dew drop detail, or gradient petal designs that require building gel structure off the nail surface.
→ Find it on Amazon: Modelones Polygel Nail Kit White and Clear

Frequently Asked Questions
What floral nail designs are trending in 2026?
Daisy nails are the single most widely searched spring and summer nail design of 2026 — the top trending styles include 3D sculpted daisy clusters, pressed real daisy encapsulations, colored-petal daisies on dark bases, and micro daisy French tips, all of which have overtaken roses and cherry blossoms in terms of search volume and salon request frequency.
Are daisy nails hard to do at home?
The basic dotting-tool daisy is genuinely one of the easiest nail designs you can do at home — five dots in a circle and one center dot — making it a perfect starting point for complete beginners; the advanced versions like 3D sculpted clusters and gel dew drops require more tools and practice but are fully documented with step-by-step instructions in this guide.
What nail colors go best with daisy nail art?
The most versatile daisy bases are nude, cobalt blue, sage green, and black — nude creates a natural, elegant feel; cobalt and sage make white daisies pop with strong contrast; black turns the traditional sweet daisy into something bold and graphic that works across all skin tones and aesthetics.
How do I make daisy nail art last longer?
Seal your daisy designs with a gel or no-chip top coat rather than regular polish top coat — gel sealing extends daisy nail art by up to two extra weeks compared to regular polish, especially for dotting-tool designs where the raised dots are vulnerable to chipping without proper encapsulation.
Final Thoughts
Daisy nails in 2026 are not just a trend — they’re a whole design language that speaks in minimalist, bold, retro, botanical, and sculptural dialects all at once. Whether you spend five minutes with a dotting tool or two hours with a gel sculpture kit, there’s a daisy nail design in this guide that was made exactly for you. Save your favorites, pick your technique, and go grow something beautiful on your fingertips — share your finished look in the comments!
