

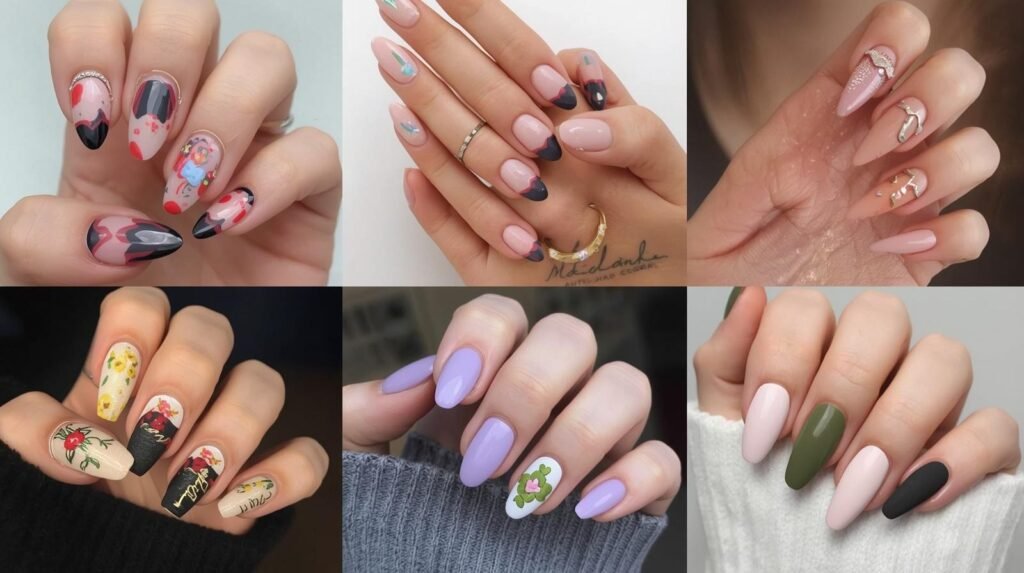
Trendy April nails 2026 deserve their own spotlight — and here’s why this month is genuinely different from the rest of spring. April sits in that electric in-between space where winter finally loosens its grip, rain showers make everything smell like possibility, and your wardrobe starts pulling out its boldest pieces. The nail design ideas this month call for are not just “spring nails” — they’re April nails: weather-inspired, mood-driven, and refreshingly specific. This guide covers 30+ brand-new designs built around everything April represents in 2026.
Why Trendy April Nails 2026 Deserve Their Own Trend Moment
April is genuinely underrated as a nail season. Most people think of spring as one big trend block — but nail artists and beauty insiders know that April has its own distinct energy. It’s the month of unpredictable weather, blooming trees, tax deadlines turned girls’ trips, Easter Sunday outfits, golden-hour evenings that arrive earlier every week, and that specific feeling of the world waking back up Spring Nail design ideas in 2026 are responding to all of that — they’re more textured, more expressive, and more intentional than the broad “spring manicure” category. Think iridescent rain-inspired finishes, moody floral art, cherry blossom chrome, transitional earth tones, and bold graphic styles that match April’s “anything goes” energy. These are the nail design ideas that make April feel like the style month it truly is.
30+ Trendy April Nail Design Ideas for 2026
Each design below is crafted specifically for April 2026 — inspired by the season’s unique events, moods, and aesthetics. Every single one is fresh and original.
1. April Showers Iridescent Nails
Inspired by April’s legendary rain showers, this design uses a semi-translucent iridescent top coat over a cool grey or soft white base to mimic the look of rain on glass. As light hits your nails, they shift between silver, lilac, and icy blue — just like rain on a windowpane. It’s one of the most original nail art design ideas of 2026 and works beautifully on both short rounded nails and medium almond shapes.
How to Create This Look:
- Step 1: Apply two coats of a soft cool-grey or mist-white base polish and let dry completely.
- Step 2: Paint thin, random vertical streaks of a slightly darker grey over the base using a thin liner brush to mimic raindrops trailing down glass — keep them irregular and organic.
- Step 3: Apply one coat of an iridescent duochrome top coat over the entire nail and finish with a high-gloss seal coat.
2. Cherry Blossom Branch Nail Art
April is peak cherry blossom season — and this design captures the delicate beauty of a blossoming branch painted across a nude or white base in soft pink and mauve tones. Unlike generic flower designs, this one features a thin branch drawn in light brown spanning multiple nails, with tiny five-petal blooms clustered at the ends. It tells a story across your entire hand and feels more like wearable art than a simple manicure.
How to Create This Look:
- Step 1: Apply a sheer nude or off-white base across all nails and let dry fully.
- Step 2: Using a fine liner brush and light brown polish, paint a delicate branching line that begins at the base of your pinky nail and extends across the ring and middle fingers — add smaller branches curving upward on each nail.
- Step 3: Dot tiny blush-pink and deep rose flowers at each branch tip using a small dotting tool, add white highlight dots to each bloom center, then seal with a glossy top coat.
3. Moody Blue-Grey Textured Nails
April weather is moody — sometimes brilliantly sunny, sometimes dramatically overcast — and this design embraces the latter with a deep blue-grey base that has a subtle sand or micro-glitter texture. The matte-textured finish looks and feels like storm clouds, giving your nails a depth and dimension that smooth polish simply can’t replicate. A bold, editorial nail design idea for people who like their spring darker and more atmospheric.
How to Create This Look:
- Step 1: Apply a base coat, then two thick coats of a blue-grey textured polish (or a regular deep blue-grey topped with a fine matte glitter topcoat for DIY texture).
- Step 2: Let each layer dry fully — do not apply a glossy topcoat, as the matte texture is the entire aesthetic of this design.
- Step 3: Finish with a matte sealing coat to lock in the look and protect the texture from chipping.
4. Rainbow After the Rain Ombre Tips
A clear or translucent base with a rainbow ombre along the tip — red bleeding into orange, yellow, green, teal, and violet — captures the magic of April’s most iconic natural event. Unlike a typical ombre, this design keeps each color band narrow and precise along the tip edge, creating a sharp, graphic rainbow French tip that looks modern and fresh on both short square and medium almond nails. A genuinely unique nail art design idea that nobody will have seen before.
How to Create This Look:
- Step 1: Apply a clear base coat and let dry — the transparent nail will show through the rainbow tip for maximum effect.
- Step 2: Using a fine striping brush, paint six narrow horizontal bands of color across the tip of each nail: red at the very edge, then orange, yellow, green, blue, and violet moving inward toward the nail bed.
- Step 3: Blend the edges very slightly where they meet using a clean brush, then seal with a glossy top coat.
5. Pressed Wildflower Encapsulated Nails
April’s roadsides and meadows are bursting with wildflowers — and encapsulating tiny dried wildflowers inside a clear or blush gel extension turns your nails into miniature botanical specimens. Each nail becomes a unique, one-of-a-kind piece because the flower placement is never identical twice. This is one of the most premium and artistic gel nail design ideas of 2026, and it requires a nail tech but the result is absolutely breathtaking.
How to Create This Look:
- Step 1: Apply a gel base and a thin coat of clear builder gel or gel polish, cure until just slightly tacky.
- Step 2: Place tiny pressed and dried wildflowers — forget-me-nots, baby’s breath, or dried lavender sprigs — onto the tacky gel surface using tweezers, then seal with a generous layer of clear builder gel and cure fully.
- Step 3: File and buff the surface smooth, apply a final high-gloss gel top coat, and cure to lock in the botanical design.
6. Watery Watercolor Wash Nails
Watercolor nail art uses diluted, translucent layers of polish to create soft, wash-like color effects that mimic the look of wet watercolor paper. In April 2026, the trending color combination is a wash of teal, sage, and warm amber — like an abstract painting of April’s landscape seen from above. No hard lines, no precision required — the beauty is in the unpredictability of where the color bleeds and how it settles.
How to Create This Look:
- Step 1: Apply a sheer white gel or polish base and let dry — this acts as your watercolor paper and makes the colors appear more vivid.
- Step 2: Use a flat nail art brush lightly loaded with a very thin, diluted teal polish to sweep loose, organic color patches across the nail — then add sage green and warm amber in sparse, overlapping strokes before the previous layer dries.
- Step 3: Allow all color to dry fully without disturbing it, then seal with a single coat of glossy top coat applied gently to avoid smearing the soft washes.
7. April Birthday Confetti Nails
For the April birthday girls (and everyone who loves celebrating them), this design scatters holographic micro-confetti — tiny squares, stars, and circles in gold, silver, and iridescent finishes — across a clear or sheer jelly base for a party-ready nail that catches every light. Unlike traditional glitter nails, confetti nails use flat, shaped pieces that lie flat against the nail and create a completely different texture and visual effect. Celebratory, joyful, and undeniably fun.
How to Create This Look:
- Step 1: Apply two to three coats of a sheer jelly polish in a soft rose or clear base, letting each layer dry fully.
- Step 2: While the final coat is still slightly tacky, use a silicone brush or the tip of a toothpick to individually place nail confetti pieces across the nail surface in a scattered, random pattern — vary the density so some areas are denser and some are sparse.
- Step 3: Apply two coats of glossy top coat over the confetti pieces, filling in around each piece fully to create a smooth, even surface.
8. Earth Day Geometric Nails
April 22nd is Earth Day — and this design honors it with a clean geometric nail featuring organic earthy tones: terracotta, sage, warm sand, and deep forest green divided into bold triangular or hexagonal segments across the nail. Each nail becomes a mosaic of earth tones that feels both modern and grounded. One of the most original nail design ideas in this guide — and the kind of nail that starts conversations.
How to Create This Look:
- Step 1: Apply a sandy nude base and dry completely.
- Step 2: Use nail tape to mask triangular sections of each nail, then fill each exposed section with a different earth-tone color — terracotta, sage, forest green. Peel tape while each section is still wet.
- Step 3: Clean the intersecting lines with a fine brush dipped in acetone, then seal the entire design with a matte top coat for an editorial, nature-inspired finish.
9. Tulip Field Nail Art
April is tulip season — and this design brings a tulip field directly to your nails. A soft sky blue background represents the April sky, while the bottom third of each nail features a row of tiny hand-painted tulips in red, yellow, pink, and purple. The tulips are simple silhouettes — a rounded cup shape on a thin stem — which makes them achievable even for beginners with a dotting tool and steady hand. Charming, seasonal, and completely original.
How to Create This Look:
- Step 1: Paint all nails with two coats of a soft powder-blue polish and dry fully.
- Step 2: Using a thin art brush and various bright colors, paint three to five tiny tulip heads at the base of each nail — a small rounded oval with a notched top — then add a thin green stem extending upward from each bloom.
- Step 3: Let the art dry fully, add tiny green leaf strokes beside each stem, then seal with a glossy top coat.
10. Cloud-Painted Negative Space Nails
April skies are full of dramatic, billowing clouds — and this negative space design uses a white gel polish to paint loose, puffy cloud silhouettes against the bare, natural nail as the “sky.” The result is an abstract sky scene on each finger where your real nail becomes the pale blue backdrop and the white clouds float naturally across it. One of the most creative and truly one-of-a-kind nail art design ideas in this entire series.
How to Create This Look:
- Step 1: Apply a single very thin coat of a sheer icy blue tint across all nails — just enough to give the bare nail a sky-like color while still appearing transparent.
- Step 2: Using a flat nail art brush loaded with white gel or regular polish, dab loose, organic cloud shapes across the nail — clusters of rounded bumps that mimic cumulus cloud outlines, leaving plenty of “sky” visible around them.
- Step 3: Add faint blue-grey shadows beneath each cloud using a diluted grey, then seal with a satin finish top coat.
11. Tortoiseshell in Spring Tones
The classic tortoiseshell pattern gets a completely fresh April update when rendered in spring tones rather than traditional warm browns. Imagine the familiar swirling patches done in dusty rose, warm taupe, sage green, and soft amber — all the colors of an April garden blended in the same organic, abstract style as classic tortoiseshell. It’s sophisticated, unexpected, and deeply original as a spring nail design idea for 2026.
How to Create This Look:
- Step 1: Apply a warm cream or champagne base across all nails and dry fully.
- Step 2: Using a thin brush, paint irregular curved patches of dusty rose, sage, and amber across the nail in varying sizes — then while still slightly wet, blur the edges of adjacent patches using a clean brush or fine sponge.
- Step 3: Add darker deepening strokes in a warm taupe inside some patches for depth and dimension, then seal with a glossy top coat.
12. Translucent Petal Overlay Nails
This advanced nail art technique layers translucent petal shapes — painted in sheer, semi-transparent gel — over a soft nude or blush base so the petals appear to float on the nail surface like fallen flower petals resting on skin. The sheer gel creates a true sense of depth and dimension that looks three-dimensional without any 3D elements. Delicate, bridal, and utterly April-appropriate.
How to Create This Look:
- Step 1: Apply a sheer blush or warm nude gel base and cure fully.
- Step 2: Mix a small amount of clear gel with a tiny drop of pink or soft coral gel polish to create a translucent, tinted petal color — then use a flat nail art brush to paint broad, loose oval petal shapes across the nail, overlapping slightly for a scattered, fallen-petal effect. Cure.
- Step 3: Apply a glossy gel top coat and cure to seal, letting the translucency of the petals create natural depth against the nude base beneath.
13. Gold Leaf on Chocolate Brown Nails
A rich, warm chocolate brown base studded with abstract patches of real gold leaf creates a manicure that reads as deeply luxurious and very April — the warm brown echoes fresh-turned earth after spring rain, and the gold leaf brings the warmth of April sunshine. The contrast is dramatic and editorial. This is the nail design idea for the person who wants their spring manicure to feel like a fashion magazine cover rather than a typical seasonal look.
How to Create This Look:
- Step 1: Apply two coats of a rich chocolate-brown nail polish and let dry to a fully opaque finish.
- Step 2: Apply a thin strip of nail foil adhesive in one to two irregular areas on each nail — let it become tacky, then press torn pieces of genuine gold leaf onto the adhesive areas and gently press down with a silicone brush.
- Step 3: Brush away excess gold leaf with a clean dry brush, then seal carefully with a glossy top coat, applying it over the gold in one smooth pass to avoid lifting the leaf.
14. Retro Checkered Nails in April Brights
Unlike pastel checkerboard designs, this April version uses two vivid contrasting colors — tangerine orange and cobalt blue, or chartreuse and hot pink — in a bold checkerboard grid that feels retro-inspired and full of April’s spontaneous, colorful energy. The bright contrast pops beautifully on all skin tones and turns even short square nails into a real fashion statement. A fresh take on a trending nail design idea that no previous article in this series has touched.
How to Create This Look:
- Step 1: Paint the entire nail in your first bright color and let dry completely — patience here ensures the cleanest grid lines.
- Step 2: Apply a grid of thin nail tape strips across the nail, leaving the squares you want painted exposed, then fill each exposed square with your second bright color. Peel all tape immediately while the second color is still wet.
- Step 3: Clean any bleeding with a fine acetone brush, let dry fully, then seal with a single thick coat of high-gloss top coat.
15. Soft Linen Textured Nails
As spring wardrobes shift toward linen and natural textures, nails are following suit with a linen-inspired finish — a warm off-white or natural ecru base with the tiniest hint of visible texture that mimics woven fabric. Achieved using a fine linen-effect nail powder or a stippled application technique, this understated nail design idea is pure quiet luxury and pairs perfectly with the neutral, natural fashion aesthetic that defines April 2026 style.
How to Create This Look:
- Step 1: Apply a warm off-white or ecru base coat and allow to dry.
- Step 2: Lightly stipple a barely-tinted warm grey over the dry base using a torn piece of sponge — the goal is extremely light, almost invisible texture rather than visible color, like the weave of natural fabric.
- Step 3: Apply a matte top coat to seal and flatten the surface into a soft, fabric-like finish.
16. Mushroom Mocha Nails with Gold Swirls
Mushroom mocha — a warm, greige-brown that blends grey, beige, and taupe — is one of the most coveted nail shades of April 2026. Pair it with thin gold swirl lines drawn freehand across one or two accent nails and you have a manicure that bridges understated sophistication with artistic flair. This is a completely original nail design idea that taps into the quiet-luxury movement while keeping a seasonal freshness.
How to Create This Look:
- Step 1: Apply two coats of mushroom mocha nail polish across all nails and let dry to a smooth, even finish.
- Step 2: Using a gold nail art liner pen or a thin striping brush loaded with gold polish, draw loose, flowing swirl lines across one or two accent nails — start at the base and let the swirl trail naturally toward the tip without overthinking the shape.
- Step 3: Seal with a glossy top coat once the gold lines are fully dry — the contrast between the warm matte brown and the gold gloss is the whole magic of this design.
17. Foiled Velvet Nails
Velvet nails — achieved using a velvet powder or a specific pressing technique — create a surface that genuinely looks and feels like fabric on your fingertips. In April’s deep, saturated jewel tones like amethyst, emerald, or midnight navy, velvet nails have an opulence that feels perfectly matched to the transitional season. This is one of the most tactile and unexpected nail art design ideas in 2026 — and once you see them in person, you’ll understand the obsession.
How to Create This Look:
- Step 1: Apply two coats of your chosen deep jewel-tone gel polish — amethyst, emerald, or navy — and cure.
- Step 2: While the top gel coat is still uncured (or apply a special velvet-compatible tacky top coat), press velvet flock powder onto the nail surface using a silicone applicator and pat firmly to adhere the fibers evenly.
- Step 3: Tap off any excess powder, then seal the edges (but not the velvet surface) with a thin line of gel top coat around the perimeter to prevent lifting — the center should remain matte and velvety.
18. Abstract Ink Blot Nails
Inspired by Rorschach ink blot art, this design creates symmetrical abstract shapes on each nail using a water-marbling or folding technique that produces a unique, mirrored pattern every single time. In moody April tones — deep violet, charcoal, and ivory — the ink blot nail looks cerebral, artistic, and completely unlike anything else in your feed. Perfect for the nail lover who treats their manicure as genuine art.
How to Create This Look:
- Step 1: Apply a white or ivory base and let dry. Place a small drop of deep violet polish in the center of the nail and immediately fold a piece of cling film over the nail, pressing and releasing quickly to create an abstract blot-like spread.
- Step 2: Repeat with a small drop of charcoal in a slightly different position on two or three nails for variation — the goal is imperfect symmetry and organic spreading.
- Step 3: Let dry completely without touching — the natural spreading is the art — then seal with a glossy top coat.
19. April Green: Fresh Grass Nails
Not sage. Not mint. Not olive. This is fresh-cut-grass green — a vivid, yellow-leaning green that captures the specific shade of new growth that only exists in April when the world is at its most brilliantly, almost aggressively alive. On short nails it looks punchy and fashion-forward; on long almond nails it becomes an editorial statement. A green nail design idea that’s entirely its own entity and unlike anything in the previous articles in this cluster.
How to Create This Look:
- Step 1: Apply a white base coat and let dry — this brings out the true brightness of the vivid green and prevents it from looking muddy.
- Step 2: Apply two full, even coats of fresh grass green polish over the white base, building to a fully saturated, opaque finish.
- Step 3: Seal with a glossy top coat — the combination of the white base and glossy seal makes this green look almost luminescent in any light.
20. Ombre Sunset Nails — April Dusk
April sunsets deserve a dedicated nail design. This ombre transitions from a warm terracotta orange at the nail base, through a dusty rose mid-section, into a soft purple-pink at the tip — exactly mimicking the layered color spectrum of an April evening sky at dusk. Unlike a typical ombre, the middle tone here is the visual focal point rather than the transition, which makes this design feel more painterly and less formulaic than standard gradient nails.
How to Create This Look:
- Step 1: Apply a terracotta base polish and dry. Load a makeup sponge with all three shades — terracotta, dusty rose, and soft violet — placed in thirds side by side on the sponge surface.
- Step 2: Press and lightly roll the sponge across the nail in one smooth motion, then repeat two to three times to build an even, seamless blend — the terracotta should start at the base and the violet should reach the tip.
- Step 3: Clean edges, apply a thin coat of glossy top coat to smooth the ombre bands, and let dry fully.
21. Dewy Pearl Nails with Micro Crystals
Morning dew on spring flowers is the inspo behind this nail: a luminous pearl base coat — somewhere between white and iridescent — with a scattering of tiny Swarovski-style micro crystals clustered near the cuticle like beads of water catching the early April light. It’s tactile, three-dimensional, and elegant without being over-the-top. One of the most refined and wearable nail design ideas in this entire guide.
How to Create This Look:
- Step 1: Apply two coats of a pearlescent white-to-silver shift polish and let dry — the base should have a natural, luminous quality without obvious glitter or shimmer particles.
- Step 2: Using a dotting tool or wax pencil, pick up individual micro-crystals (size SS3 or SS5) and press them onto the wet top coat near the cuticle area, clustering them in a crescent arc like dew drops gathered at the base of a petal.
- Step 3: Apply a layer of crystal-safe gel top coat around and between the crystals (not over them) to seal them securely in place.
22. Lemon Drop Nails
Lemon yellow meets glossy candy-finish polish for a nail that looks like the inside of a lemon drop sweet — bright, cheerful, and almost edible. The saturated lemon yellow is distinct from butter yellow in that it reads more vivid and citrus-sharp, making it one of the most energizing nail design ideas for April 2026. It flatters warm and medium skin tones especially well and photographs like a dream in natural spring light.
How to Create This Look:
- Step 1: Apply a white base coat and let dry — essential for achieving the true lemon-yellow brightness without any green undertone shift.
- Step 2: Paint two coats of a saturated lemon yellow, letting each dry fully, then apply a third thin coat for maximum opacity if needed.
- Step 3: Apply two coats of a thick, domed glossy top coat for the candy-lacquer finish that makes this design so visually arresting.
23. Abstract Line Art Nails
Minimal, gestural line art drawn directly on a nude or white nail using a single fine liner brush creates a surprisingly impactful nail design idea that requires very little skill but looks deliberate and modern. Think loose curved lines, intersecting arcs, and organic shapes in black, deep navy, or a single contrasting spring color — the kind of mark-making that looks like a sketch in a fashion designer’s notebook rather than a typical manicure.
How to Create This Look:
- Step 1: Apply two clean coats of a bright white or warm nude polish and let dry to a perfectly smooth, even finish.
- Step 2: Using a nail art liner brush dipped in black or deep navy polish, draw two to four loose, confident curved or angular lines across each nail — vary the line weight slightly by pressing harder at some points and lifting at others for natural variation.
- Step 3: Let the lines dry for a full two minutes before applying a glossy top coat to prevent smearing of the fine details.
24. Midnight Garden Nails
April nights still carry a cool, mysterious edge — and midnight garden nails capture that with a deep black-green base, like the color of ivy in moonlight, with tiny hand-painted white botanical details: fine leaf outlines, dot clusters, and linear fern fronds that glow ghost-like against the dark background. It’s dramatic and deeply original — the April nail for people who love night walks and rainy evenings as much as they love sunshine.
How to Create This Look:
- Step 1: Apply two coats of a very deep hunter or forest green polish — it should read almost black under indoor light but reveal its green depth in sunlight.
- Step 2: Using a very fine liner brush and white nail polish, draw delicate botanical outlines: small oval leaves on thin stems, tiny five-dot flower clusters, and single curving fern fronds. Keep the lines thin and the spacing generous.
- Step 3: Let the white art dry completely before sealing with a single glossy top coat — this keeps the fine white lines crisp and sharp.
25. Washed Denim Blue Nails
The specific shade of your favorite worn-in denim jacket — faded, slightly uneven, and full of personality — translated into nail polish is one of the most wearable and genuinely stylish nail design ideas of April 2026. The trick is the finish: not glossy, not fully matte, but a soft satin that mimics the way light falls on real denim fabric. Pair with anything in your wardrobe and they instantly look intentional and cool.
How to Create This Look:
- Step 1: Apply a medium denim-blue base and let dry — look for shades described as “faded denim,” “chambray,” or “washed blue” for the right tone.
- Step 2: Lightly stipple a slightly lighter blue over the center of each nail using a torn sponge piece — just enough to create a faded, uneven quality rather than flat, uniform color.
- Step 3: Apply a satin (not glossy, not fully matte) top coat for the exact light-catching finish of real denim fabric.
26. Rose Quartz Crystal Nails
Rose quartz — soft, translucent, warm pink with white veining — is one of April’s most iconic crystals and one of 2026’s most captivating nail inspirations. The effect is achieved with a sheer rose base, thin irregular white veins drawn freehand, and a high-gloss top coat that gives the nails the smooth, polished quality of an actual gemstone. Natural, beautiful, and unmistakably April.
How to Create This Look:
- Step 1: Apply a sheer, warm rose pink base — two to three thin coats for a translucent, stone-like depth — and let dry completely.
- Step 2: Using a very fine liner brush in white, draw irregular, branching veins across each nail — unlike marble, rose quartz veins are shorter, more fragmented, and distributed more evenly across the surface rather than flowing in one direction.
- Step 3: Blur the veins very slightly with a dry brush to soften their edges, then apply a thick, high-gloss top coat for a polished gemstone finish.
27. Frosted Blossom Nails
Early April sometimes brings a last unexpected frost — and frosted blossom nails capture that fleeting, beautiful moment when ice meets flowers. A white frost effect is achieved across a pastel floral base using a specific dabbing technique that creates a crystalline, icy surface texture over the top of the bloom design beneath. It’s a layered, narrative nail design idea — two seasons in one, spring and winter’s final breath.
How to Create This Look:
- Step 1: Apply a blush or lavender base and hand-paint two or three small simple flowers — five-petal outlines in a slightly deeper shade — on accent nails. Let dry fully.
- Step 2: Mix a small amount of clear nail polish with white polish (about 80% clear to 20% white) and stipple the frosted mix lightly across the entire nail using a sponge — the semi-transparent frosted layer should partially obscure but not completely cover the flowers beneath.
- Step 3: Seal with a satin top coat — not fully glossy, not fully matte — for the icy-but-luminous frosted effect.
28. Bronzed Earth Nails with Flecked Copper
A warm bronze-brown base — reminiscent of fertile spring soil — scattered with irregular flecks of copper and rose gold foil creates a nail that looks like the earth itself glittering after a rain shower. The organic placement of the metallic flecks makes no two nails identical, and the warm metallic tones are deeply flattering across a broad range of skin tones. Sophisticated, earthy, and completely current for April 2026.
How to Create This Look:
- Step 1: Apply two coats of a warm bronze-brown nail polish and let dry fully.
- Step 2: Apply a thin, patchy layer of foil adhesive in irregular spots across the nail, let become tacky, then press torn pieces of copper and rose gold transfer foil alternately across the adhesive patches and peel back.
- Step 3: Seal with a glossy top coat applied carefully in one direction to avoid displacing the copper flecks.
29. Gradient Lavender to Smoke Nails
This is an ombre that nobody else in this series has done — a gradient that transitions from a pale, barely-there lavender at the nail base into a deep, cool charcoal-smoke at the tip. The effect is like watching storm clouds roll in across an April sky — moody, dramatic, and strangely beautiful. An elegant nail design idea for people who want spring with an edge.
How to Create This Look:
- Step 1: Apply a pale lavender base across all nails and dry fully — this is your lightest gradient point at the base.
- Step 2: Load a makeup sponge with lavender at one end and charcoal-grey at the other, then press it onto the nail starting from the tip downward, repeating until the gradient from pale lavender to deep smoke is smooth and seamless.
- Step 3: Clean any mess around the cuticle, seal with a matte top coat for a moody, atmospheric finish that makes the color shift look like actual fog.
30. Neon Coral French Tips with a Twist
A vivid neon coral French tip on a clear base sounds straightforward — but the twist is the wavy, organic smile line rather than the traditional straight arch. The wobbly, hand-drawn curve of the tip makes this design feel playful, handmade, and full of personality. Neon coral against a transparent nail base has an almost stained-glass quality that’s completely fresh for April 2026 and unlike any French tip design covered elsewhere in this series.
How to Create This Look:
- Step 1: Apply a clear or very lightly tinted sheer base coat and let dry — the transparency is essential for the stained-glass effect.
- Step 2: Using a thin nail art liner brush loaded with neon coral, draw a freehand wavy line across the tip of each nail — intentionally imperfect curves and wobbles are the design, not mistakes.
- Step 3: Fill in the tip area above the wavy line with the neon coral, let dry fully, then seal with a high-gloss top coat to intensify the neon color’s translucency against the clear base.
How to Choose Your April Nail Design
April gives you permission to be more experimental with your nails than any other month. The season is in flux — warm then cool, sunny then rainy, formal then spontaneous — and your nails can reflect that same beautiful unpredictability. When choosing from these nail design ideas, think about your April plans rather than just your aesthetic preferences. If you have an event, Easter brunch, or birthday celebration this month, lean toward the rose quartz, dewy pearl, or confetti designs. If you’re working from home and want something atmospheric, the midnight garden, ink blot, or cloud nails deliver a creative outlet without requiring you to perform them for the world. If April has you outdoors and active, the fresh grass green, lemon drop, or washed denim are durable, practical, and still show-stopping.
For short fingernail design ideas, the linen texture, mushroom mocha, retro checkered, and single-color options like fresh grass or lemon drop all work brilliantly without needing nail length to look polished. For longer almond nail design ideas, the cherry blossom branch, botanical midnight garden, translucent petal overlay, and April sunset ombre all benefit from the extra canvas of a longer nail. The most important thing is choosing the design that genuinely excites you — that energy always translates into a better finished result, whether you’re doing your own nails or bringing this guide to your nail tech.
Best Products to Achieve This Look
These three products are specifically matched to the unique techniques and finishes featured in this April nail guide:
🛒 Makartt Nail Art Liner Brush Set (10 Piece)
Why we love it: The cherry blossom branch, abstract line art, botanical midnight garden, and rose quartz vein designs all demand ultra-fine liner brushes with precise, consistent tips — and the Makartt set covers every size you need, from hair-thin detail brushes to flat shaders for watercolor wash effects. The brushes hold their shape over dozens of uses and don’t splay after the first wash.
Best for: Anyone tackling the hand-painted, detail-intensive designs in this April nail guide — especially the botanical and artistic styles unique to this article.
→ Find it on Amazon: [Makartt Nail Art Liner Brush Set]
[AMAZON LINK: search “Makartt nail art liner brush set” on amazon.com]
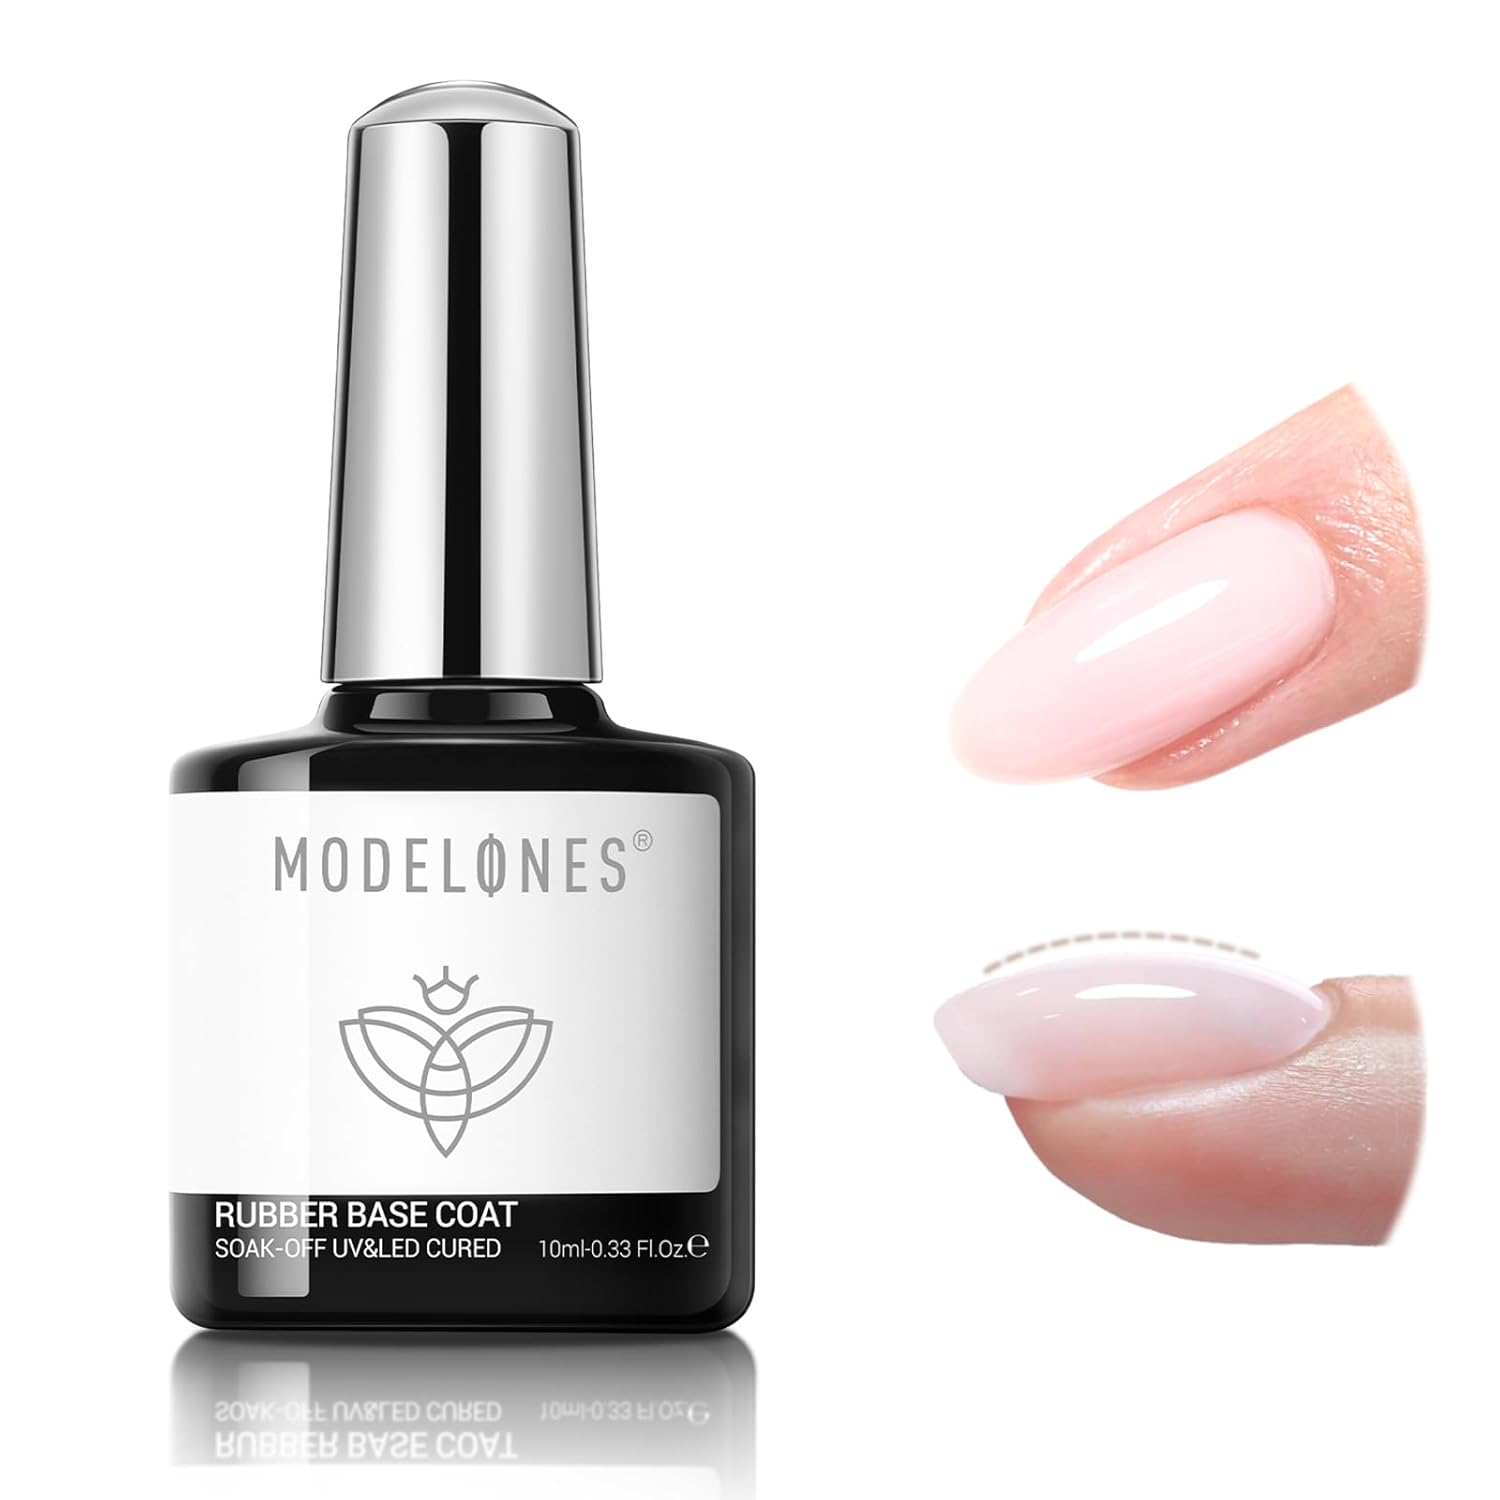
🛒 Modelones Builder Gel in a Bottle — Clear & Sheer Pink
Why we love it: The pressed wildflower encapsulated nails and translucent petal overlay designs both require a high-clarity, self-leveling builder gel that cures without yellowing and keeps botanical elements or color translucency perfectly visible. Modelones builder gel ticks every box — it’s thick enough to encapsulate elements without sinking, clear enough to maintain true transparency, and cures hard enough for long-lasting wear.
Best for: Anyone creating encapsulated botanical nails or any design in this guide that requires layering over preserved natural elements or translucent gel overlays.
→ Find it on Amazon: Modelones Builder Gel Clear and Sheer Pink
Frequently Asked Questions
What are the most popular April nail design ideas for 2026?
The most searched and saved April nails 2026 include cherry blossom branch nail art, iridescent rain-inspired finishes, tulip field designs, rose quartz crystal nails, and the fresh grass green — each tied to April’s specific seasonal moments, events, and natural world rather than generic spring trends.
How long does an April nail manicure last?
Standard polish versions of these designs last five to seven days with a quality top coat reapplied every two to three days, while gel versions — especially the encapsulated botanical and crystal designs — last three to four weeks with proper prep and daily cuticle oil application.
Can I do April nails at home without a nail tech?
The majority of these designs — including the watercolor wash, lemon drop, abstract line art, washed denim, and ombre styles — are fully achievable at home with basic tools; the encapsulated wildflower and velvet nail designs are best done by a professional for the cleanest, most durable results.
What nail shape works best for April nail designs?
Short square and short oval shapes handle the bolder graphic designs like retro checkerboard, lemon drop, and abstract line art beautifully, while medium almond shapes are perfect for the more narrative designs — cherry blossom branches, midnight garden botanicals, and the April dusk sunset ombre — that benefit from a slightly larger canvas.
Final Thoughts
April nails 2026 are in a category of their own — specific, expressive, and packed with designs that go beyond generic spring trends to capture what this particular month actually looks, feels, and sounds like. Whether you choose the moody midnight garden, the joyful tulip field, or the luminous dewy pearl, you’re wearing April on your hands. Save your top three picks, grab your tools, and let this month’s manicure be your most intentional one yet. Tell us your favorite in the comments!
